
3.18.2011
3.10.2011
Note to self
::stumbles zombie like into the kitchen, groping for coffee::
Note to self: do not stay up until 2am sewing no matter how fun it is, when you know you have to get up early and actually be functional the next day.
Note to self: do not stay up until 2am sewing no matter how fun it is, when you know you have to get up early and actually be functional the next day.
3.08.2011
Making Face Cleaning Pads
My latest project is a bit like craft tweeting. I've been making small, super fast little projects. What am I talking about? Well, let me digress for a moment...
I use witch hazel as an astringent to clean my face and I feel bad every time I use a cotton ball just once, or one of those nice little pressed cotton pads and then chuck it in the trash. As I came down to the last one in my jar a week or so ago I thought there had to be a better way. I'd tried making Tawashi crocheted cotton flowers but they were just too rough and didn't hold the witch hazel very well. They do however, make excellent little face scrubbers in the shower. Sooo... what about microquilts? They're the same idea as the pressed cotton pads except much cuter AND they use up quilting scraps. You can chuck 'em in the laundry with the clothes to get them clean and reuse them. Perfect!
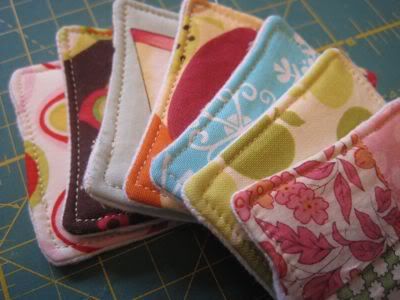
An array of cleaning pads
They are super simple to make.
1.) Cut out one 3" square of each of the following for one cleaning pad:
*Top fabric (cute quilting cotton)
*Batting (I used scrap warm and natural)
*Backing (I used white cotton flannel)
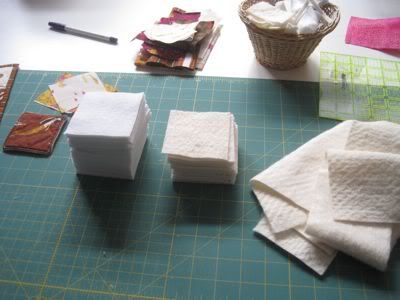
Since I was making a whole slew I cut out a few stacks of each.
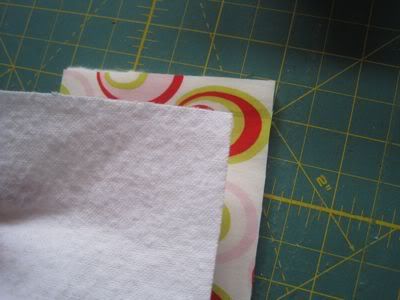
2.) Lay the fabrics down in this order:
Place the batting down on the table with the top fabric right side up, on top of it.

Place the backing fabric wrong side up on top of the batting and top fabric.
3.) Starting near a corner, stitch nearly all the way around using a 1/4" seam allowance. Cut the corners off so there is less bulk when you turn it. Be sure to leave a 1" to 2" gap so you can turn it inside out. Turn it so that the fabric comes through between the backing and the top fabric. (Think of the batting and the cute fabric as one).
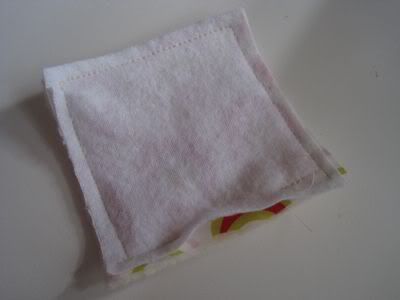
4.) Make sure to poke the corners out so they're nice and square. Tuck in the unsewn bits and top stitch using 1/8" seam allowance all the way around to secure the edges.

5.) Yup - that's it! You're done. Go wash your face. ^^
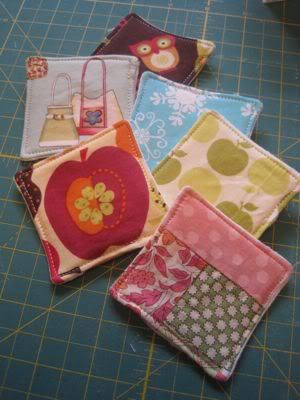
Remember you can even use bits of old quilt blocks you have laying around, see the bottom right pink and green one - it used to be a bento block. Anything works really.
I use witch hazel as an astringent to clean my face and I feel bad every time I use a cotton ball just once, or one of those nice little pressed cotton pads and then chuck it in the trash. As I came down to the last one in my jar a week or so ago I thought there had to be a better way. I'd tried making Tawashi crocheted cotton flowers but they were just too rough and didn't hold the witch hazel very well. They do however, make excellent little face scrubbers in the shower. Sooo... what about microquilts? They're the same idea as the pressed cotton pads except much cuter AND they use up quilting scraps. You can chuck 'em in the laundry with the clothes to get them clean and reuse them. Perfect!

An array of cleaning pads
They are super simple to make.
1.) Cut out one 3" square of each of the following for one cleaning pad:
*Top fabric (cute quilting cotton)
*Batting (I used scrap warm and natural)
*Backing (I used white cotton flannel)

Since I was making a whole slew I cut out a few stacks of each.
2.) Lay the fabrics down in this order:
Place the batting down on the table with the top fabric right side up, on top of it.

Place the backing fabric wrong side up on top of the batting and top fabric.

3.) Starting near a corner, stitch nearly all the way around using a 1/4" seam allowance. Cut the corners off so there is less bulk when you turn it. Be sure to leave a 1" to 2" gap so you can turn it inside out. Turn it so that the fabric comes through between the backing and the top fabric. (Think of the batting and the cute fabric as one).

4.) Make sure to poke the corners out so they're nice and square. Tuck in the unsewn bits and top stitch using 1/8" seam allowance all the way around to secure the edges.

5.) Yup - that's it! You're done. Go wash your face. ^^

Remember you can even use bits of old quilt blocks you have laying around, see the bottom right pink and green one - it used to be a bento block. Anything works really.
3.05.2011
Bath Buddies and Mug Rugs
It felt good to get my crafty on this evening. Granted it was only a couple of hours worth but boy did I need it!
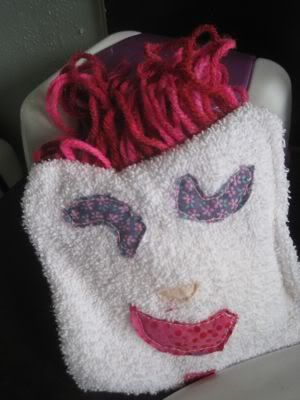
Snooky and I worked on a little project together: a bath-buddy. It's a little terry cloth case with a bar of soap inside for the bathtub. She picked out the yarn for the hair and the fabric, then she cut out the shapes of the face and glued them on with fabric glue. Once they were dry I stitched them down, made the case, let her put the bar of soap in and stitched it shut. She took a bath with it and could be heard singing a lovely little song about her bath buddy. I tried not to giggle too much.
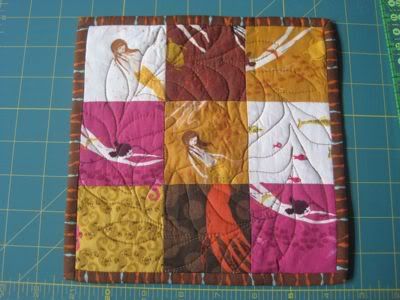
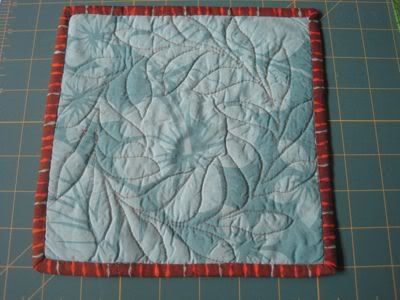
I also made a mug rug with some Mendocino scrap fabric I had. I just can't bring myself to throw any of it away! Originally I had other plans for the scrap (to be posted about soon) but when I was cutting out the squares they all looked so cute together I couldn't help myself.
I even got a chance to work on my sisters quilt - Whew~ it's a beast to shove that thing through my little tiny machine. I had a wee bit of a chat with DH today about maybe seeing what we can do about getting a midarm in the house. Of course it's all pipe dreams at the moment but maybe later this year in the fall?
And I also made myself work on an old UFO as well as start cutting a new flannel quilt for my Dad. It's nice to rotate "jobs" while sewing. I'll work on cutting for 20 minutes, then sewing for 20, then quilting - wash, rinse and repeat.
Snooky and I worked on a little project together: a bath-buddy. It's a little terry cloth case with a bar of soap inside for the bathtub. She picked out the yarn for the hair and the fabric, then she cut out the shapes of the face and glued them on with fabric glue. Once they were dry I stitched them down, made the case, let her put the bar of soap in and stitched it shut. She took a bath with it and could be heard singing a lovely little song about her bath buddy. I tried not to giggle too much.

I also made a mug rug with some Mendocino scrap fabric I had. I just can't bring myself to throw any of it away! Originally I had other plans for the scrap (to be posted about soon) but when I was cutting out the squares they all looked so cute together I couldn't help myself.


I even got a chance to work on my sisters quilt - Whew~ it's a beast to shove that thing through my little tiny machine. I had a wee bit of a chat with DH today about maybe seeing what we can do about getting a midarm in the house. Of course it's all pipe dreams at the moment but maybe later this year in the fall?
And I also made myself work on an old UFO as well as start cutting a new flannel quilt for my Dad. It's nice to rotate "jobs" while sewing. I'll work on cutting for 20 minutes, then sewing for 20, then quilting - wash, rinse and repeat.
3.03.2011
What are your favorite non-electric quilting tools?

Clockwise from top right: Quilting gloves - excellent for guiding large pieces of fabric through the machine and or quilting. I cut the tips of the glove off the index and thumb so I can easily pick off threads without them sticking to the glove. Curved basting pins. Flat headed straight pins. Magnetic pin holder - great for when you accidentally spill pins! Pointy fabric guide - I'm pretty sure that's the technical name... don't know what they're actually called but it's a great tool for quilting curved seams. Jack the Ripper - my seam ripper. Snips and scissors and a good rotary cutter. I have several rotary cutters in different sizes and one that I keep that's just for cutting paper templates and such so I don't make the one I use for fabric dull. (I rotate the blades... when the fabric blade gets too dull it moves to the paper cutter where it works just fine for a while). Omnigrip rulers - they don't slide! And a marking pen.
Most all you might recognize but one that I LOVE that's rather uncommon is the little dohicky in the center of the picture. It's a wrapping paper cutter. One Christmas when my sewing room turned into gift wrap central and everything was everywhere and it was a general disaster but I was still trying to sew... I couldn't find my snips. However the paper cutter was readily available and wouldn't you know it? It was THE BEST thing for cutting apart chained pieces. No snipping motion required at all. There's a sharp little blade under that top protective area and it's just a swiping motion that separates them... perfect for cutting thread with. It also keeps me from accidentally cutting my stitched pieces because it really won't cut fabric... so I can hurry along with no worries for those or fingers. ;-) I usually pick up a few of them right after Christmas because they're cheapest then... a buck or two. They last 6 months to a year depending on how much use they see. Do no try to buy them right before Christmas - I've seen them priced for $8 or more then!
Subscribe to:
Posts (Atom)