
4.29.2011
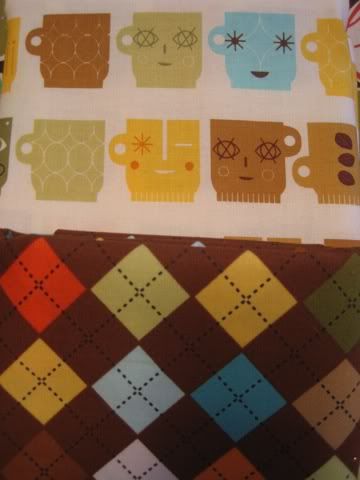
Fabric Friday - Tiki Mugs
I dunno why I find these two fabrics so appealing. Perhaps it is the retro colors and tiki flavor? I think I should make an apron out of them... they might be too busy together but at least the mug fabric must be turned into something that can go in my kitchen. Any ideas?!
4.27.2011
WIP Wednesdays
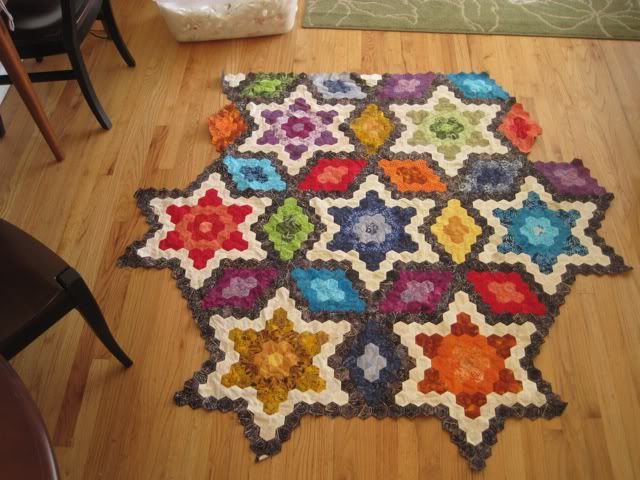
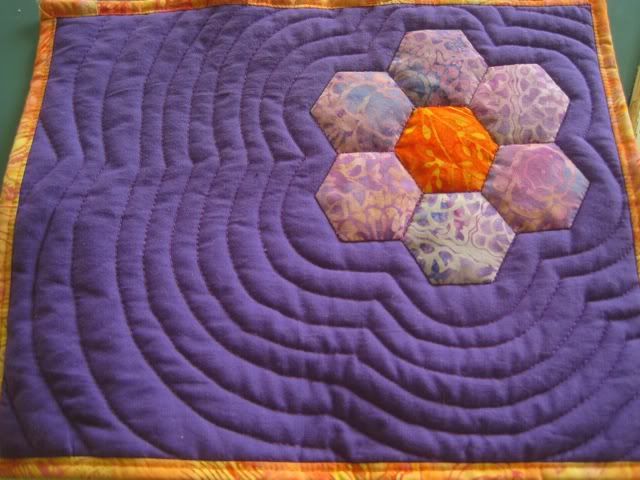
Well it's been a while since I've had anything to share. The last two months have gone by in a blur with not much time for sitting down at my sewing machine. Happily though I do have my hand work project that I pretty much drag with me everywhere. It's been a few months since I last shared any updates with you on my hexagon quilt... so here she be! I figure it's about a 1,000 pieces now... only 2,000 more to go!

4.23.2011
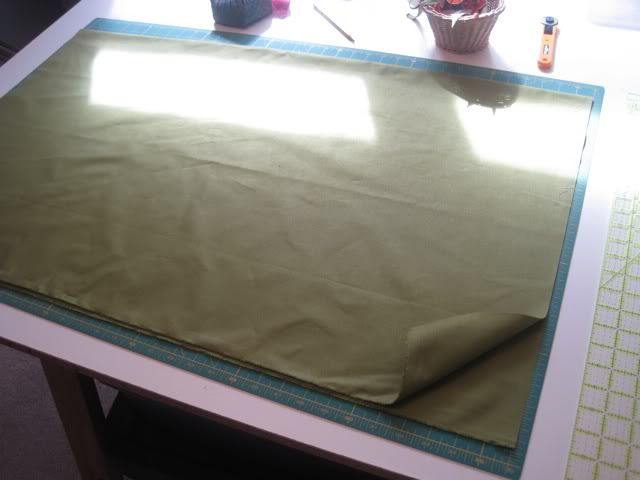
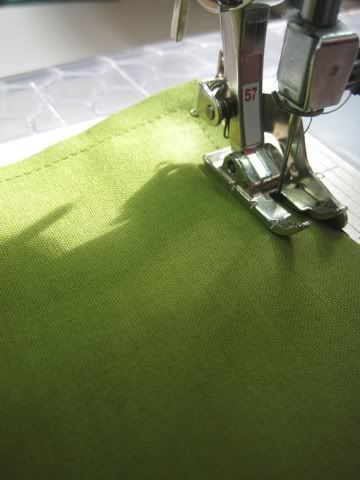
Tutorial - Windsock or One Seam Bias Binding
This is known as Windsock Binding or One Seam Binding. I'm not nearly brilliant enough to have come up with this method myself (wish I knew who did so I could give credit but alas, I do not). It's such a great way to make bias binding though I just wanted to share. The benefits of this method are:
Okay! Sound good? Then let's get started. You'll need a large cutting mat, a ruler (or two) or a yard stick, a pair of scissors, a rotary cutter, a marking pencil and of course your sewing machine and an iron.
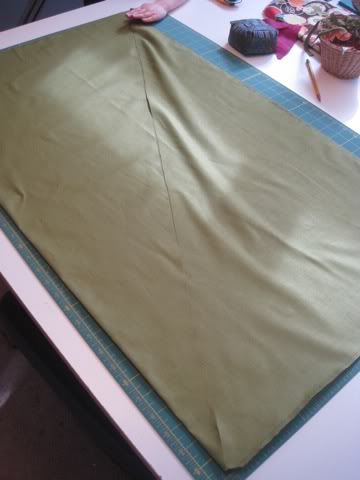
1. Take your fabric and fold in half. Use your rotary cutter to remove the selvages and square up the edges.
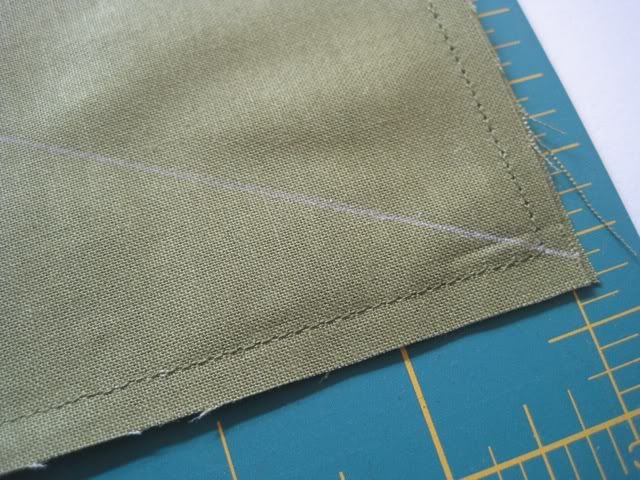
2. Take the fabric to the sewing machine and stitch the three sides closed. Do not stitch the side that is folded.
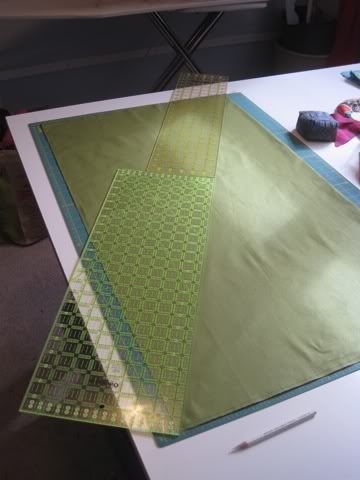
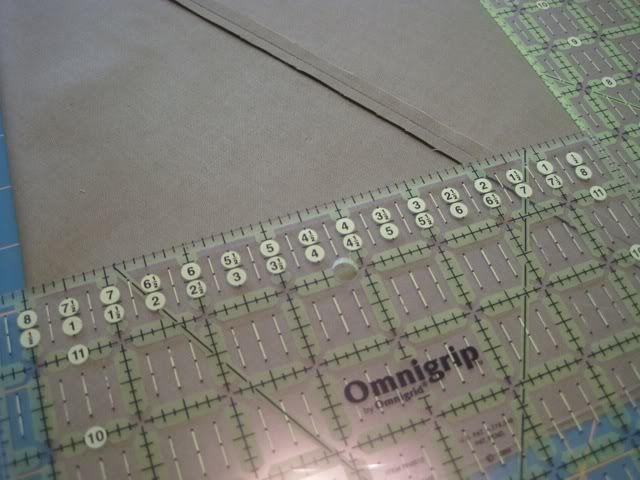
3. Bring your sewn fabric back to a large flat area and lay it back out with the folded edge at the top. You are then going to mark a diagonal line with a pencil or other marking tool from one corner to the other.
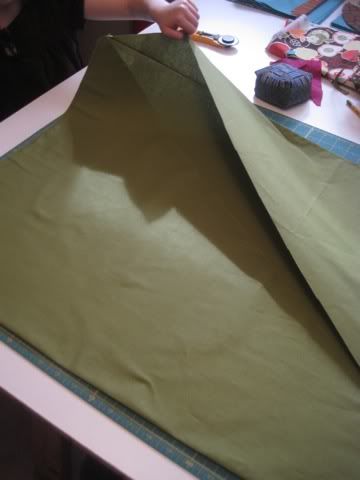
4. Cut off all four corners. Do not take a large amount off, just enough to slide scissors into the hole that it will make. Cutting off a large amount here will mean you'll have less binding later on.
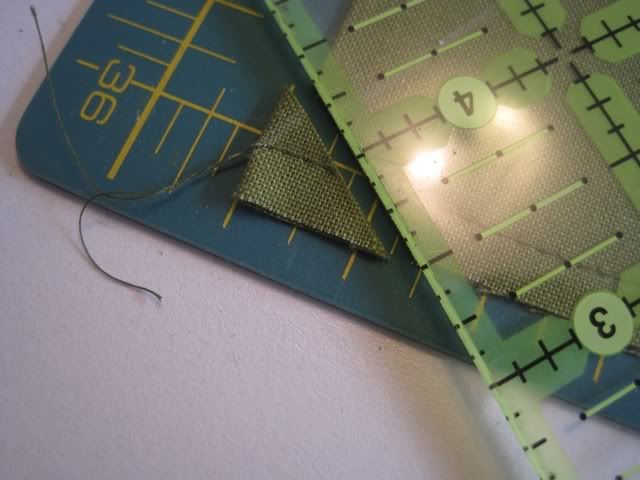
5. You are now going to slip your scissors into the little hole you just made and cut along the line you just marked. Why not use a rotary cutter here? Because you're only cutting one layer of the fabric. You must use scissors to do so.
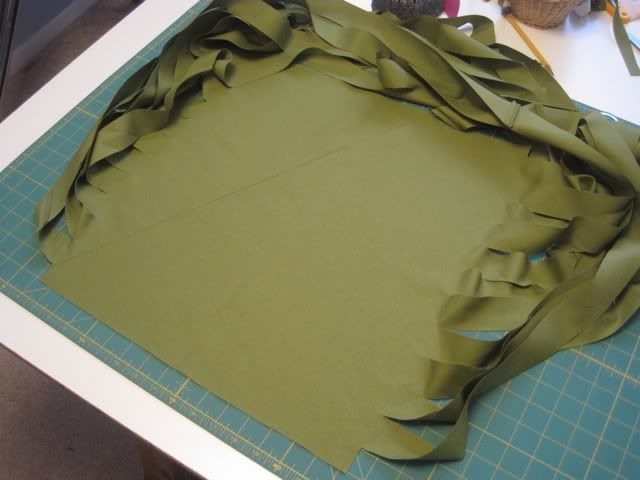
6. When you are done with that step your fabric should look like this:
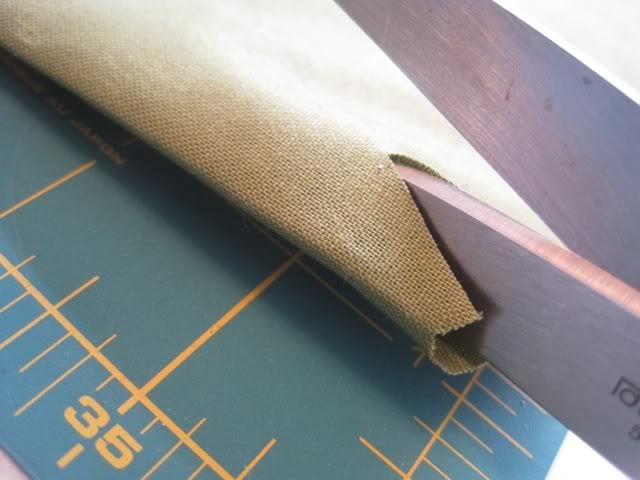
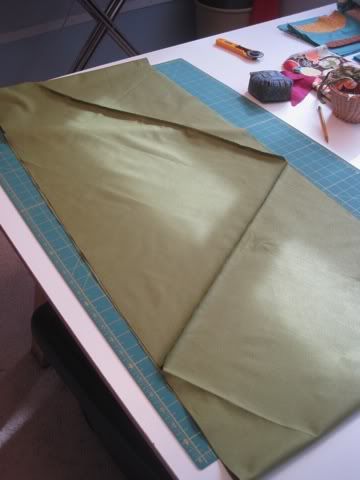
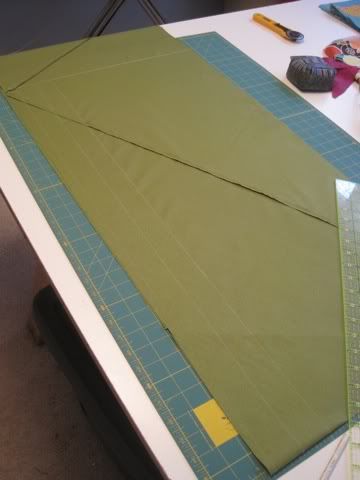
7. The next step is to flip the fabric over so the folded edge is now at the bottom. Mark your line and again. Make sure it's the same direction as your first marking. You want an "X" in the end. Cut with scissors across the fabric.

8. Grab the edges of the last cut and open up the fabric so it's in a tube shape.
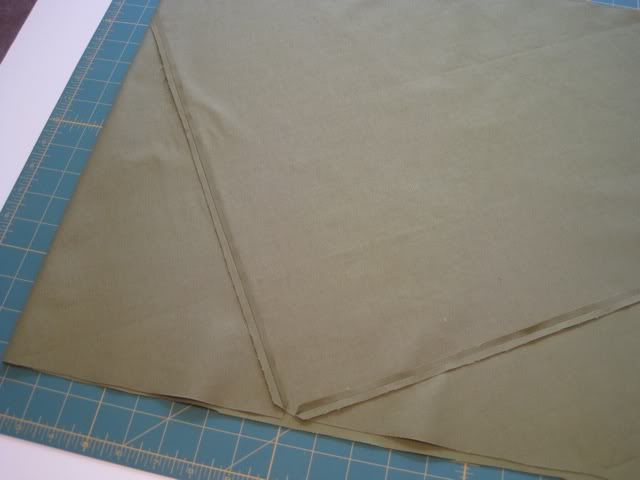
9. Press the seams open.
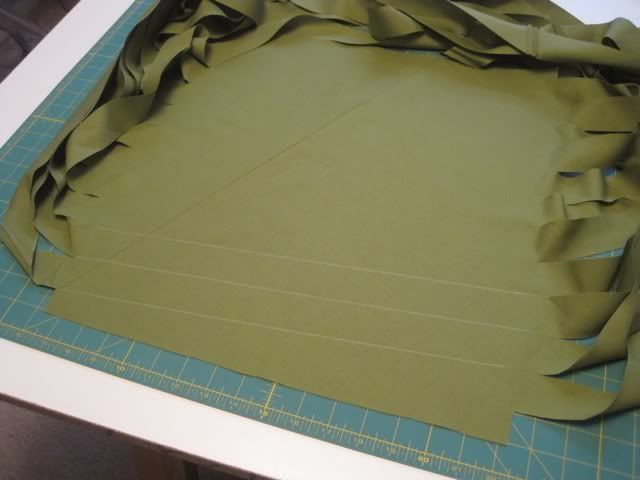
10. Mark a line between 6" and 9" from the folded edge. I know that's not real specific but it depends on how large a piece of fabric you started with. If you started with 1/2 yard 6" should be fine, if you're using more then a yard move your measurement out to the 9" from the folded edge. Don't mark further then 9" from the edge or it'll be more difficult to work with later on.
11. Using your previously marked line as a guide, mark perpendicular lines the width you want your finished open binding to be. For example if making quilting binding these parallel lines would be 2 1/2". In this case however I was making binding for an apron and needed 1 1/2" strips.
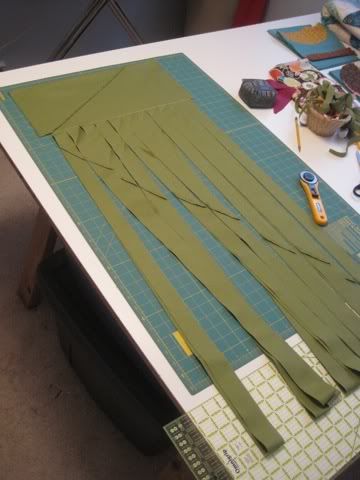
12. Once your lines are marked use a rotary cutter (or scissors) to cut from the folded edge to your marked line. Be sure to cut through both layers of fabric this time. Now you can see why this is called Windsock Binding!
13. Do NOT cut off the strips you've just made but leave them attached.
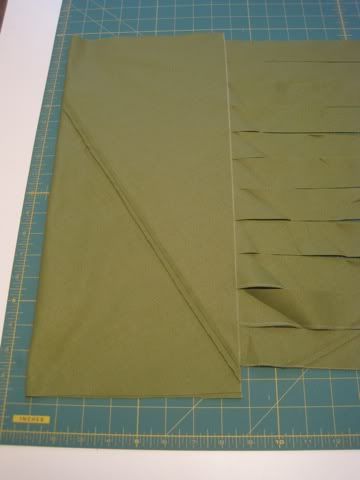
14. If you slide a finger under your folded fabric and lay it open like a book, it should look like this.
15. Take a ruler and mark lines from one cut edge to the opposite and higher cut point. You can then use a rotary cutter or scissors to cut across these areas. Make sure that it's on a diagonal otherwise you'll wind up losing your continuous strip.
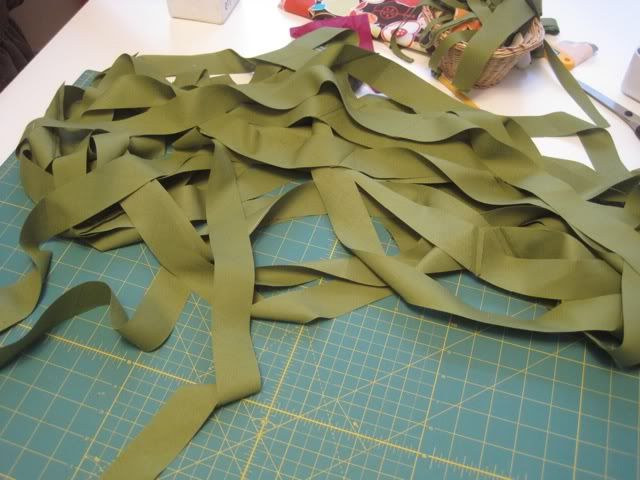
16. Mark and cut all the way up till you have nothing left but bias binding strips!
17. These open strips can now either be ironed by hand or placed on a spool to be run though a bias tape maker.
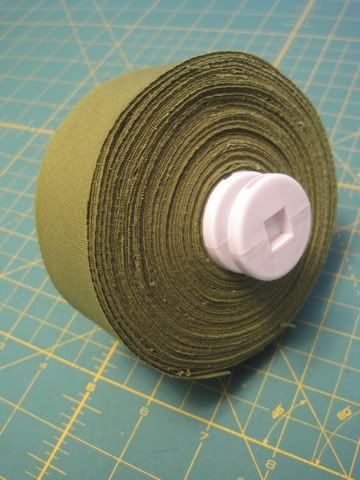
18. If you make a lot of binding I'd suggest getting one of these handy little guys, it takes hours less work to run it through this little gadget then to iron 1-3 seams into the fabric by hand.
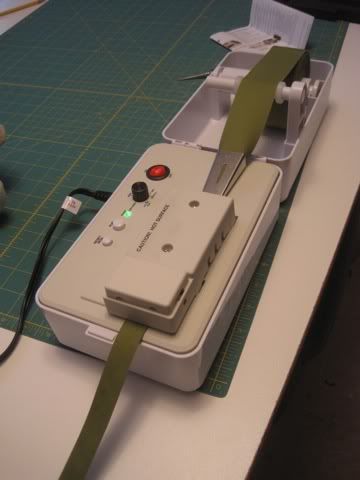
Another less expensive alternative that's easier then ironing by hand is to get a hand held bias tape maker. It will hold and fold the fabric for you while you pull it through and iron it flat as you go.

Happy Binding Everyone!
- There's just ONE seam!
- There's very little wasted fabric, it all goes to the binding.
- It's easy and fast to make compared to traditional bias binding methods.
Okay! Sound good? Then let's get started. You'll need a large cutting mat, a ruler (or two) or a yard stick, a pair of scissors, a rotary cutter, a marking pencil and of course your sewing machine and an iron.
1. Take your fabric and fold in half. Use your rotary cutter to remove the selvages and square up the edges.

2. Take the fabric to the sewing machine and stitch the three sides closed. Do not stitch the side that is folded.

3. Bring your sewn fabric back to a large flat area and lay it back out with the folded edge at the top. You are then going to mark a diagonal line with a pencil or other marking tool from one corner to the other.


4. Cut off all four corners. Do not take a large amount off, just enough to slide scissors into the hole that it will make. Cutting off a large amount here will mean you'll have less binding later on.

5. You are now going to slip your scissors into the little hole you just made and cut along the line you just marked. Why not use a rotary cutter here? Because you're only cutting one layer of the fabric. You must use scissors to do so.

6. When you are done with that step your fabric should look like this:


7. The next step is to flip the fabric over so the folded edge is now at the bottom. Mark your line and again. Make sure it's the same direction as your first marking. You want an "X" in the end. Cut with scissors across the fabric.

8. Grab the edges of the last cut and open up the fabric so it's in a tube shape.

9. Press the seams open.

10. Mark a line between 6" and 9" from the folded edge. I know that's not real specific but it depends on how large a piece of fabric you started with. If you started with 1/2 yard 6" should be fine, if you're using more then a yard move your measurement out to the 9" from the folded edge. Don't mark further then 9" from the edge or it'll be more difficult to work with later on.

11. Using your previously marked line as a guide, mark perpendicular lines the width you want your finished open binding to be. For example if making quilting binding these parallel lines would be 2 1/2". In this case however I was making binding for an apron and needed 1 1/2" strips.

12. Once your lines are marked use a rotary cutter (or scissors) to cut from the folded edge to your marked line. Be sure to cut through both layers of fabric this time. Now you can see why this is called Windsock Binding!

13. Do NOT cut off the strips you've just made but leave them attached.

14. If you slide a finger under your folded fabric and lay it open like a book, it should look like this.

15. Take a ruler and mark lines from one cut edge to the opposite and higher cut point. You can then use a rotary cutter or scissors to cut across these areas. Make sure that it's on a diagonal otherwise you'll wind up losing your continuous strip.

16. Mark and cut all the way up till you have nothing left but bias binding strips!

17. These open strips can now either be ironed by hand or placed on a spool to be run though a bias tape maker.

18. If you make a lot of binding I'd suggest getting one of these handy little guys, it takes hours less work to run it through this little gadget then to iron 1-3 seams into the fabric by hand.

Another less expensive alternative that's easier then ironing by hand is to get a hand held bias tape maker. It will hold and fold the fabric for you while you pull it through and iron it flat as you go.

Happy Binding Everyone!
4.22.2011
Fabric Friday - Sherbet Pips
I'm not usually one to run out and buy yardage of a whole line of fabric. I enjoy the one-offs and the challenge of making very different fabrics work together. However I'm starting to change my mind about that a little. When the Mendocino line came out I just loved it. But I didn't buy any thinking I could just pick some up later. Well, later never happened. It was so popular that it sold out and those people who snatched it up early were able to resell it for as much as $40/yd. I like it but I'm not that rich. Luckily I had a very generous friend who was willing to part with a small amount to satisfy my need for this fabric. I'll be sure to share more of that in a future post.
All that to say, I love the Sherbet Pip's line too. I don't think it'll go quite as fast as Mendocino but why take the chance? I don't have a pattern planned out to use with this fabric yet but that's okay. For now just knowing I have two layer-cakes tucked safely way for future is good enough. It reminds me of peppermint and winter and will someday probably be as close to a Christmas quilt as I'll get. It's just good and wintery and lovely.
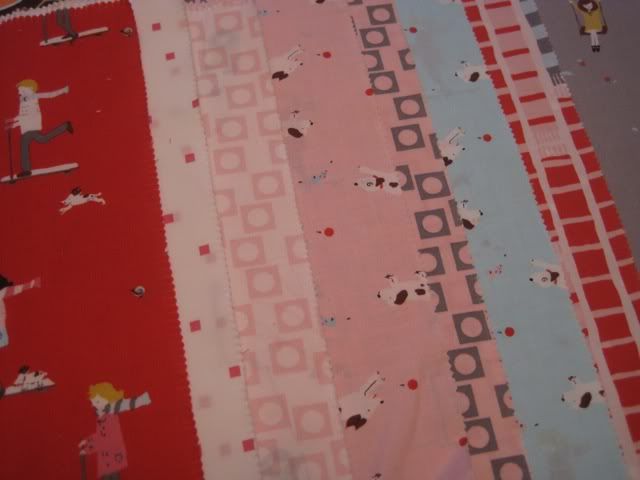
All that to say, I love the Sherbet Pip's line too. I don't think it'll go quite as fast as Mendocino but why take the chance? I don't have a pattern planned out to use with this fabric yet but that's okay. For now just knowing I have two layer-cakes tucked safely way for future is good enough. It reminds me of peppermint and winter and will someday probably be as close to a Christmas quilt as I'll get. It's just good and wintery and lovely.

4.17.2011
What could it be?
Remember that fabric I bought a month ago? Well, it's slowly but surely on its way to becoming something.... I'm almost there.

4.16.2011
Doll Quilt
While my 6-yo niece was here visiting from the east coast a few weeks ago, she asked me to make her baby panda bear a blankie. It was just at this time I was getting her Mamma (my SIL) into english paper piecing. So her Mom made the flower and I appliqued it onto a quilt top and then free-motion stitched it together. It was a fun little project.


4.15.2011
PMQG Block Swap
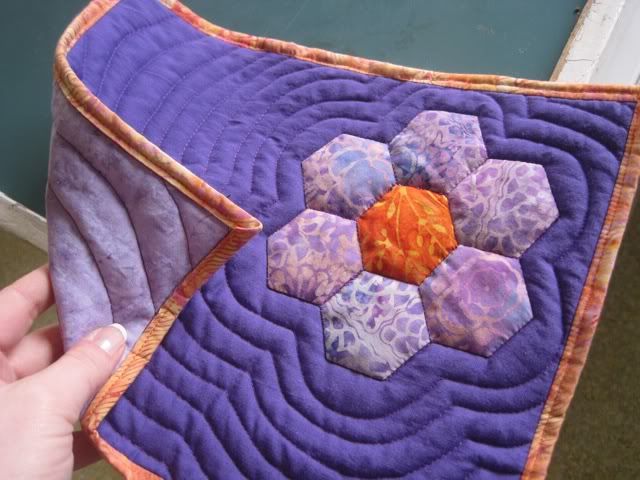
The Portland Modern Quilt Guild has a challenge for this month, to make a 12" block out of solids. We swap with someone from the guild this month and then we're assigned an, as of now, mystery project to make with the swapped block. Once we swap we'll make a project with our swapees block then trade back next month. Fun! My sister has been grumpy because I've gotten nowhere with her quilt so to appease her a little, I thought I'd make the block using colors she likes and then give her whatever it is we'll eventually get. Clear as mud? Good!
This is the block I've made:
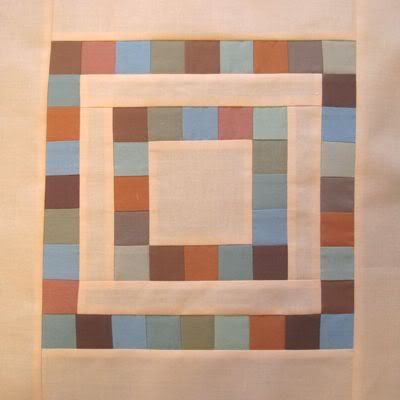
This is the block I've made:


Subscribe to:
Posts (Atom)