
3.18.2011

3.10.2011
Note to self
::stumbles zombie like into the kitchen, groping for coffee::
Note to self: do not stay up until 2am sewing no matter how fun it is, when you know you have to get up early and actually be functional the next day.
Note to self: do not stay up until 2am sewing no matter how fun it is, when you know you have to get up early and actually be functional the next day.
3.08.2011
Making Face Cleaning Pads
My latest project is a bit like craft tweeting. I've been making small, super fast little projects. What am I talking about? Well, let me digress for a moment...
I use witch hazel as an astringent to clean my face and I feel bad every time I use a cotton ball just once, or one of those nice little pressed cotton pads and then chuck it in the trash. As I came down to the last one in my jar a week or so ago I thought there had to be a better way. I'd tried making Tawashi crocheted cotton flowers but they were just too rough and didn't hold the witch hazel very well. They do however, make excellent little face scrubbers in the shower. Sooo... what about microquilts? They're the same idea as the pressed cotton pads except much cuter AND they use up quilting scraps. You can chuck 'em in the laundry with the clothes to get them clean and reuse them. Perfect!
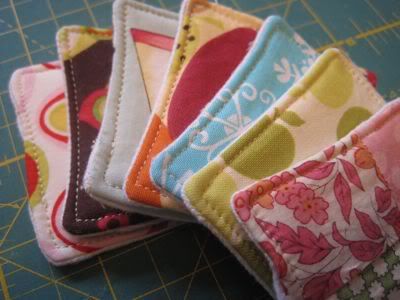
An array of cleaning pads
They are super simple to make.
1.) Cut out one 3" square of each of the following for one cleaning pad:
*Top fabric (cute quilting cotton)
*Batting (I used scrap warm and natural)
*Backing (I used white cotton flannel)
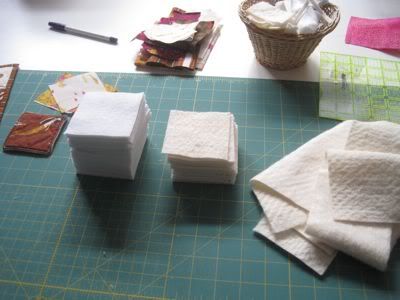
Since I was making a whole slew I cut out a few stacks of each.
2.) Lay the fabrics down in this order:
Place the batting down on the table with the top fabric right side up, on top of it.
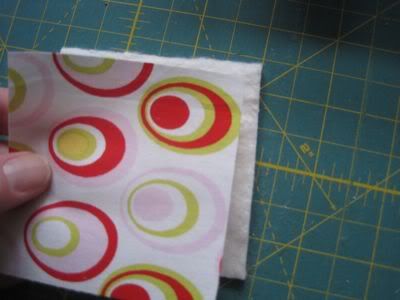
Place the backing fabric wrong side up on top of the batting and top fabric.
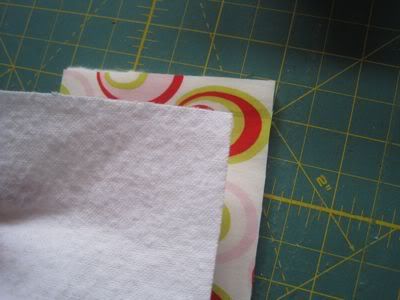
3.) Starting near a corner, stitch nearly all the way around using a 1/4" seam allowance. Cut the corners off so there is less bulk when you turn it. Be sure to leave a 1" to 2" gap so you can turn it inside out. Turn it so that the fabric comes through between the backing and the top fabric. (Think of the batting and the cute fabric as one).
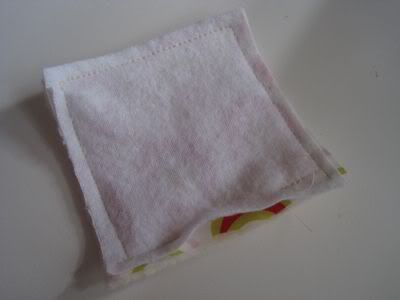
4.) Make sure to poke the corners out so they're nice and square. Tuck in the unsewn bits and top stitch using 1/8" seam allowance all the way around to secure the edges.
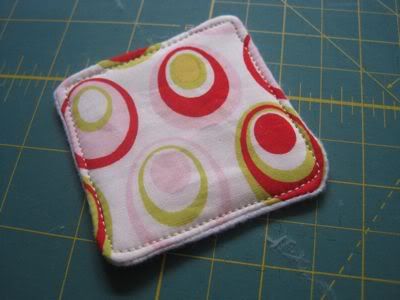
5.) Yup - that's it! You're done. Go wash your face. ^^
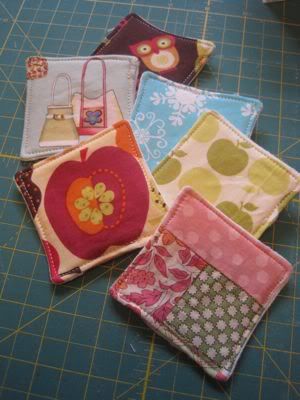
Remember you can even use bits of old quilt blocks you have laying around, see the bottom right pink and green one - it used to be a bento block. Anything works really.
I use witch hazel as an astringent to clean my face and I feel bad every time I use a cotton ball just once, or one of those nice little pressed cotton pads and then chuck it in the trash. As I came down to the last one in my jar a week or so ago I thought there had to be a better way. I'd tried making Tawashi crocheted cotton flowers but they were just too rough and didn't hold the witch hazel very well. They do however, make excellent little face scrubbers in the shower. Sooo... what about microquilts? They're the same idea as the pressed cotton pads except much cuter AND they use up quilting scraps. You can chuck 'em in the laundry with the clothes to get them clean and reuse them. Perfect!

An array of cleaning pads
They are super simple to make.
1.) Cut out one 3" square of each of the following for one cleaning pad:
*Top fabric (cute quilting cotton)
*Batting (I used scrap warm and natural)
*Backing (I used white cotton flannel)

Since I was making a whole slew I cut out a few stacks of each.
2.) Lay the fabrics down in this order:
Place the batting down on the table with the top fabric right side up, on top of it.

Place the backing fabric wrong side up on top of the batting and top fabric.

3.) Starting near a corner, stitch nearly all the way around using a 1/4" seam allowance. Cut the corners off so there is less bulk when you turn it. Be sure to leave a 1" to 2" gap so you can turn it inside out. Turn it so that the fabric comes through between the backing and the top fabric. (Think of the batting and the cute fabric as one).

4.) Make sure to poke the corners out so they're nice and square. Tuck in the unsewn bits and top stitch using 1/8" seam allowance all the way around to secure the edges.

5.) Yup - that's it! You're done. Go wash your face. ^^

Remember you can even use bits of old quilt blocks you have laying around, see the bottom right pink and green one - it used to be a bento block. Anything works really.
3.05.2011
Bath Buddies and Mug Rugs
It felt good to get my crafty on this evening. Granted it was only a couple of hours worth but boy did I need it!
Snooky and I worked on a little project together: a bath-buddy. It's a little terry cloth case with a bar of soap inside for the bathtub. She picked out the yarn for the hair and the fabric, then she cut out the shapes of the face and glued them on with fabric glue. Once they were dry I stitched them down, made the case, let her put the bar of soap in and stitched it shut. She took a bath with it and could be heard singing a lovely little song about her bath buddy. I tried not to giggle too much.
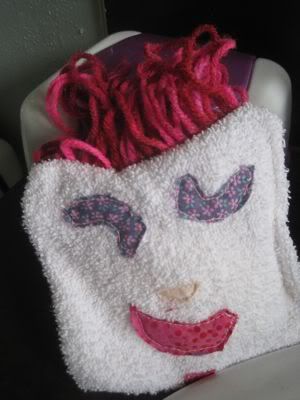
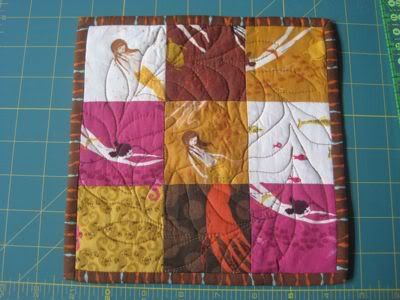
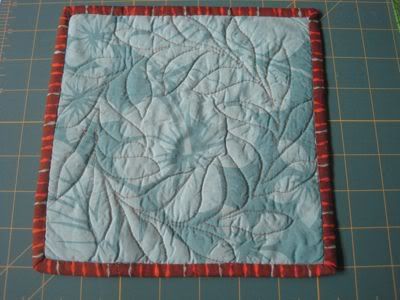
I also made a mug rug with some Mendocino scrap fabric I had. I just can't bring myself to throw any of it away! Originally I had other plans for the scrap (to be posted about soon) but when I was cutting out the squares they all looked so cute together I couldn't help myself.
I even got a chance to work on my sisters quilt - Whew~ it's a beast to shove that thing through my little tiny machine. I had a wee bit of a chat with DH today about maybe seeing what we can do about getting a midarm in the house. Of course it's all pipe dreams at the moment but maybe later this year in the fall?
And I also made myself work on an old UFO as well as start cutting a new flannel quilt for my Dad. It's nice to rotate "jobs" while sewing. I'll work on cutting for 20 minutes, then sewing for 20, then quilting - wash, rinse and repeat.
Snooky and I worked on a little project together: a bath-buddy. It's a little terry cloth case with a bar of soap inside for the bathtub. She picked out the yarn for the hair and the fabric, then she cut out the shapes of the face and glued them on with fabric glue. Once they were dry I stitched them down, made the case, let her put the bar of soap in and stitched it shut. She took a bath with it and could be heard singing a lovely little song about her bath buddy. I tried not to giggle too much.

I also made a mug rug with some Mendocino scrap fabric I had. I just can't bring myself to throw any of it away! Originally I had other plans for the scrap (to be posted about soon) but when I was cutting out the squares they all looked so cute together I couldn't help myself.


I even got a chance to work on my sisters quilt - Whew~ it's a beast to shove that thing through my little tiny machine. I had a wee bit of a chat with DH today about maybe seeing what we can do about getting a midarm in the house. Of course it's all pipe dreams at the moment but maybe later this year in the fall?
And I also made myself work on an old UFO as well as start cutting a new flannel quilt for my Dad. It's nice to rotate "jobs" while sewing. I'll work on cutting for 20 minutes, then sewing for 20, then quilting - wash, rinse and repeat.
3.03.2011
What are your favorite non-electric quilting tools?

Clockwise from top right: Quilting gloves - excellent for guiding large pieces of fabric through the machine and or quilting. I cut the tips of the glove off the index and thumb so I can easily pick off threads without them sticking to the glove. Curved basting pins. Flat headed straight pins. Magnetic pin holder - great for when you accidentally spill pins! Pointy fabric guide - I'm pretty sure that's the technical name... don't know what they're actually called but it's a great tool for quilting curved seams. Jack the Ripper - my seam ripper. Snips and scissors and a good rotary cutter. I have several rotary cutters in different sizes and one that I keep that's just for cutting paper templates and such so I don't make the one I use for fabric dull. (I rotate the blades... when the fabric blade gets too dull it moves to the paper cutter where it works just fine for a while). Omnigrip rulers - they don't slide! And a marking pen.
Most all you might recognize but one that I LOVE that's rather uncommon is the little dohicky in the center of the picture. It's a wrapping paper cutter. One Christmas when my sewing room turned into gift wrap central and everything was everywhere and it was a general disaster but I was still trying to sew... I couldn't find my snips. However the paper cutter was readily available and wouldn't you know it? It was THE BEST thing for cutting apart chained pieces. No snipping motion required at all. There's a sharp little blade under that top protective area and it's just a swiping motion that separates them... perfect for cutting thread with. It also keeps me from accidentally cutting my stitched pieces because it really won't cut fabric... so I can hurry along with no worries for those or fingers. ;-) I usually pick up a few of them right after Christmas because they're cheapest then... a buck or two. They last 6 months to a year depending on how much use they see. Do no try to buy them right before Christmas - I've seen them priced for $8 or more then!
2.26.2011
I can't believe I haven't made a post in a month! This February has been just nuts. All of my free time has been devoted to other endeavors, like searching out a good elementary school for our daughter who will start kindergarten in the fall (lots of round-ups, open houses and applications), filing our taxes, working on the quarterly GIG newsletter, starting seeds for the 2011 garden, not to mention all the regular stuff that needs taken care of. Happily it's almost over. ;^)
I have spent exactly two hours in my sewing room this month so not a lot to show. I worked a bit more on my sister's quilt and I also started cutting out the fabric for the Love Bubbles quilt.

Just to show how busy I've been I couldn't even manage to finish a mug rug for the PMQG meeting.

I managed to get it pinned but nothing else! How sad.
I did manage to sneak out of the house twice this month on quilt related sojourns. The first to the February PMQG meeting. Those are always so much fun. I even won glue! I've never used fabric glue as a way of basting and with my curved piecing coming up it might be handy.
I also went to a local quiltboard.com meet-up this afternoon. It was really lovely to meet such a nice group of women! We had a fat quarter swap and there was a lot of show and tell. No one appreciates a quilters work like other quilters.

Top: Terry (Theresa), Mary (CrazyBaker), Me, Jen (sew cornie), Roxanne (roxannebcb)
Bottom: Karen (KarenBarnes), Laurie (quiltingnonie), Trish (trish b), Kelly (madamekelly)
I have spent exactly two hours in my sewing room this month so not a lot to show. I worked a bit more on my sister's quilt and I also started cutting out the fabric for the Love Bubbles quilt.

Just to show how busy I've been I couldn't even manage to finish a mug rug for the PMQG meeting.

I managed to get it pinned but nothing else! How sad.
I did manage to sneak out of the house twice this month on quilt related sojourns. The first to the February PMQG meeting. Those are always so much fun. I even won glue! I've never used fabric glue as a way of basting and with my curved piecing coming up it might be handy.
I also went to a local quiltboard.com meet-up this afternoon. It was really lovely to meet such a nice group of women! We had a fat quarter swap and there was a lot of show and tell. No one appreciates a quilters work like other quilters.

Top: Terry (Theresa), Mary (CrazyBaker), Me, Jen (sew cornie), Roxanne (roxannebcb)
Bottom: Karen (KarenBarnes), Laurie (quiltingnonie), Trish (trish b), Kelly (madamekelly)
1.29.2011
Sew On
I had a super fun time at Cherri's open studio, Sew On. It was really nice to get to talk to some of the PMQG members outside of a meeting environment. Such sweet ladies, all of them!
Also Cherri's studio was dreamy and it was great to give her longarm a spin. Seems like a lot of the women there really enjoyed it too. I wonder how many of us went home and straight to a quilting project? ;^)
PS: Thanks for the cookies Cherri!
Also Cherri's studio was dreamy and it was great to give her longarm a spin. Seems like a lot of the women there really enjoyed it too. I wonder how many of us went home and straight to a quilting project? ;^)
PS: Thanks for the cookies Cherri!
1.28.2011
Fabric Friday
Remember when my friend Kristel sent me some lovely limey greens for my pending patio quilt? Well in the same package she also sent me some Heather Ross "Mendocino". This is incredibly generous of her! I tried to buy some of this fabric after the fact and it has become very coveted and rather over priced (IMHO). So WOW! I feel very special that she chose me to share a bit of this little treasure with. I also now feel a great deal of pressure to make the coolest thing evar with it! lol I'll have to find some worthy project to put it toward. If anyone has any pattern ideas please let me know, I could use the help... though I do have a vague notion bubbling in the back of my brain. The Mendocino amounts are pretty small so I'll have to be extra creative.

The other thing she sneakily snuck into her package was a covered note book. It's adorable!

I may put this little cutie to work when I pay my bills. I have a little note pad I keep track of spending in, and the one I'm currently using expires in August so this may step up and take it's place. I always need a little bit of HAPPY when paying bills and what better to fix that then pretty fabric that came from a friend?
Last week you may remember me talking about giving up fabric shopping. Laurie over at Dodging the Butterfly asked a couple of great questions in regards to that,

The other thing she sneakily snuck into her package was a covered note book. It's adorable!

I may put this little cutie to work when I pay my bills. I have a little note pad I keep track of spending in, and the one I'm currently using expires in August so this may step up and take it's place. I always need a little bit of HAPPY when paying bills and what better to fix that then pretty fabric that came from a friend?
Last week you may remember me talking about giving up fabric shopping. Laurie over at Dodging the Butterfly asked a couple of great questions in regards to that,
I am curious to know how 2009 went? Is this something you do every other year?I started to answer her in the comments but realized that I was *rambling* and I thought for anyone else that might be interested I'd answer here.
I quit my day job and became a SAHM in mid 2008. Naturally we went from two paychecks to one. As we adjusted to a new income bracket lots of things that we took for granted were cut. Fancy cable? Out! Eating at restaurants? Out! Excessive fabric shopping? Out! This was probably the first time in my life I'd ever made a conscious effort to not buy fabric. The truth is, if we could have continued to afford it, I never would've given it up. Heh. But as it turns out that was not the case.
At first it took some getting used to. I'd still try to sneak in a FQ or two every trip to the fabric store (when buying other supplies like thread) but after a few times doing that I realized I was "robbing" our grocery fund to realistically have fabric just sit in a bin in my sewing room because I thought it was pretty. It was easier to give up then.
I do have my exception rules: it's okay to buy a FQ or two if we take a day trip out to the beach (which doesn't happen but a couple of times of year at most) or if some other special occasion presents itself, like going out to the Sister's Quilt Show.
It was good to embrace the heart of quilting again, which is use what you have. Yeah, it'd be nice to buy all contemporary fabrics in the same line that are color coordinated and aesthetically appealing but where's the challenge in that? ;^) One of my most favorite quilts I've made to date came out of this thrifty decision. Forced to use only what I had - and a lot of it didn't (and still doesn't) really "go together" I had to get creative in how to use the fabrics to make a cohesive aesthetic. Enter, my Colorworks Quilt.
I only strayed once or twice in 2009 and then after New Year in 2010 with my "resolution" over, I kinda allowed myself a little freedom. Apparently given an inch I'll take ayardmile! By the end of 2010 I was spending more then I should have and was having a hard time reeling back. While a little better off financially due to raises and payed off bills, etc. I was still straining our budget. (Wow - that makes it sounds like I was spending a lot more then I actually was - lol) I'd also bought enough fabric to make more quilts then I'll get around to in the next year so it was easy to say in 2011 I needed to go back to not buying fabric.
In case you haven't checked out my Nu's tab I've got enough to keep me busy for the next five years at least... not to mention my WIP's and UFO's... okay ten years. I really don't need any more fabric. I think it's time to just enjoy the quilting process.
Honestly though, I wonder if that's possible without a little bit of fabric shopping thrown in? lol Maybe I'll keep up my abstinence till I go back to work though and just try to take more vacations. ;^)

1.26.2011
WIP Wednesdays
Portland Modern Quilt Guild
I went to the PMQG meeting Thursday night. Click the link to see what we're up to. Want proof I was there? Third picture down (on the PMQG blog), that's me in the black hat right behind the lady in green. What? You can't tell that's me? lol Sadly I didn't win anything this time around but it's still fun to be excited for those who do get the give-a-ways.

For the FQ swap I wound up with a cute little green one - my favorite color!
Hexagon Quilts
Also it was *awesome-possum* to see Tania finish the bulk of her squid hexagon quilt - so cool! We both started our hexagon quilts at the same time. She's super speedy. I loved getting a chance to look at all the fabrics close up. We had a nice little chat after the meeting about hexi's. (Yay for crazy english paper piecers!)
And I didn't know they took a picture of my hex in progress... ::grin:: Yeah, it's been stalled out a little bit but you can see I've finally finished the orange star. Next up with that project is to add in the diamonds around the blue star and attach the teal and orange stars so it's all one big piece. Then I can start working on the outer stars. What? You thought that was it? No, no. I am insane. Ha.

Kaleidoscope Quilt
Sunday was not a good quilting day. I was in the middle of working on my sister's quilt when...

...my kiddo comes into my sewing room with a red permanent marker. Yes. You can imagine what happened next. I nearly knocked her over in my rush to run from my sewing room to the laundry room, quilt in hand, to hit the effected area with a stain remover. The good news is, I was able to get most of it out.

You can hardly see where there's just a little bit of the red pen mark left.
The bad news, it was sitting there mostly stain free but also with a couple of spots of stain remover on it. The stain remover isn't supposed to dry on the fabric so I really needed to wash it out. However, because it's still all mostly pinned together, there's no way I could put it in a washing machine. I knew if I didn't treat it right away though it'd have a permanent mark. So after I sprayed it, I tried my best to rinse out just those spots. There was a big drippy chunk of it that then needed drying. I draped it over the shower curtain rod in the bathroom where it took all day and night to dry out enough to move back into the sewing room.

After all the rinsing and scrubbing I couldn't find any mark once it was dry. Whew~!
Apron
So in the meantime, instead of working on my sister's quilt I started the apron my daughter's been begging me for.

The Lola Apron
She picked out the pink fabric and I chose the coordinating fabrics to go with it. I'm not planning on any rick-rack (as shown in the pattern) since she said she didn't want any. I love how sophisticated this will all look together.

The pink will be the main body, the light grey patterned one will be at the top chest and for the pockets, the solid as the binding.

Here it is all done and sitting on the work table long after everyone else had fallen asleep.

She tried it on the next morning and it fits her perfectly!
I went to the PMQG meeting Thursday night. Click the link to see what we're up to. Want proof I was there? Third picture down (on the PMQG blog), that's me in the black hat right behind the lady in green. What? You can't tell that's me? lol Sadly I didn't win anything this time around but it's still fun to be excited for those who do get the give-a-ways.

For the FQ swap I wound up with a cute little green one - my favorite color!
Hexagon Quilts
Also it was *awesome-possum* to see Tania finish the bulk of her squid hexagon quilt - so cool! We both started our hexagon quilts at the same time. She's super speedy. I loved getting a chance to look at all the fabrics close up. We had a nice little chat after the meeting about hexi's. (Yay for crazy english paper piecers!)
And I didn't know they took a picture of my hex in progress... ::grin:: Yeah, it's been stalled out a little bit but you can see I've finally finished the orange star. Next up with that project is to add in the diamonds around the blue star and attach the teal and orange stars so it's all one big piece. Then I can start working on the outer stars. What? You thought that was it? No, no. I am insane. Ha.

Kaleidoscope Quilt
Sunday was not a good quilting day. I was in the middle of working on my sister's quilt when...

...my kiddo comes into my sewing room with a red permanent marker. Yes. You can imagine what happened next. I nearly knocked her over in my rush to run from my sewing room to the laundry room, quilt in hand, to hit the effected area with a stain remover. The good news is, I was able to get most of it out.

You can hardly see where there's just a little bit of the red pen mark left.
The bad news, it was sitting there mostly stain free but also with a couple of spots of stain remover on it. The stain remover isn't supposed to dry on the fabric so I really needed to wash it out. However, because it's still all mostly pinned together, there's no way I could put it in a washing machine. I knew if I didn't treat it right away though it'd have a permanent mark. So after I sprayed it, I tried my best to rinse out just those spots. There was a big drippy chunk of it that then needed drying. I draped it over the shower curtain rod in the bathroom where it took all day and night to dry out enough to move back into the sewing room.

After all the rinsing and scrubbing I couldn't find any mark once it was dry. Whew~!
Apron
So in the meantime, instead of working on my sister's quilt I started the apron my daughter's been begging me for.

The Lola Apron
She picked out the pink fabric and I chose the coordinating fabrics to go with it. I'm not planning on any rick-rack (as shown in the pattern) since she said she didn't want any. I love how sophisticated this will all look together.

The pink will be the main body, the light grey patterned one will be at the top chest and for the pockets, the solid as the binding.

Here it is all done and sitting on the work table long after everyone else had fallen asleep.

She tried it on the next morning and it fits her perfectly!
1.21.2011
Fabric Friday
I was thinking that my fabric Fridays were going to be pretty sparse this year considering I've decided to give up fabric shopping.* But? So far so good! I still have things to share with you. I'd like to say THANK YOU! to Kristel for donating a wee bit of lovely green fabric toward my Oregon Patio quilt. She is such a dear! I'd been hoping to get some of these patterns but this line sold out quickly around here. How sweet that she offered to send enough to make a few "tiles" each for the patio? They'll go perfectly. Yay!

She also sent me a wee bit more fabric (Oh my generous friend!) but I'll save that for next week. It'll be a nice thing to share with you next Friday. Plus the suspense might be fun, yes?
*I've decided to get back on the "no new fabrics" wagon this year. (I gave up fabric shopping in 2009 too) Meaning that I'm not allowed to make trips to the fabric store to buy random beautifully patterned fabrics just because I like them. Oh no. I am however, allowed to buy fabric that will complete a project. For example buying backing fabric. Really that's about it. Maybe binding fabric if I really have nothing in my stash. I'm also allowed notions as needed, needles, thread, etc.
My one other exception to this rule is vacation fabric. Heh. So if I'm on vacation (unlikely since we're a bit broke) and go into a fabric store I'm allowed a fat quarter or two. When in Sister's this summer for the quilt show (my one guaranteed vacation) I'll also let myself get some fabric... probably more then a FQ though, since it'll be all about the quilting that weekend. Yes I'm excited already. ^^ I'll try not to break the bank.

She also sent me a wee bit more fabric (Oh my generous friend!) but I'll save that for next week. It'll be a nice thing to share with you next Friday. Plus the suspense might be fun, yes?
*I've decided to get back on the "no new fabrics" wagon this year. (I gave up fabric shopping in 2009 too) Meaning that I'm not allowed to make trips to the fabric store to buy random beautifully patterned fabrics just because I like them. Oh no. I am however, allowed to buy fabric that will complete a project. For example buying backing fabric. Really that's about it. Maybe binding fabric if I really have nothing in my stash. I'm also allowed notions as needed, needles, thread, etc.
My one other exception to this rule is vacation fabric. Heh. So if I'm on vacation (unlikely since we're a bit broke) and go into a fabric store I'm allowed a fat quarter or two. When in Sister's this summer for the quilt show (my one guaranteed vacation) I'll also let myself get some fabric... probably more then a FQ though, since it'll be all about the quilting that weekend. Yes I'm excited already. ^^ I'll try not to break the bank.
Subscribe to:
Posts (Atom)